
Blame
|
1 | # Repository Management |
||||||
| 2 | ||||||||
| 3 | > [!WARNING] |
|||||||
| 4 | > The following features are experimental and may cause unexpected behavior. Use them carefully and report any issues you encounter. |
|||||||
| 5 | ||||||||
| 6 | The **Repository Management** page under **Settings** allows you to configure various ways to manage your wiki repository, including HTTP access for users, automated pushes on every wiki change, and automatic pulls when external changes occur. |
|||||||
| 7 | ||||||||
| 8 | ||||||||
| 9 | ## Git Web Server |
|||||||
| 10 | ||||||||
| 11 | Enabling Git Web Server allows users to access wiki contents as a regular git repository via HTTP. Users with `READ` permission can pull changes, while users with `UPLOAD` permission can push changes as well. |
|||||||
| 12 | ||||||||
| 13 | ||||||||
| 14 | ## Pushing to and Pulling from SSH Remote |
|||||||
| 15 | ||||||||
| 16 | You can enable automatic pushing to or pulling from a pre-defined git remote whenever changes occur on either side. Both settings are not connected to each other in any way and only one or both could be enabled when needed. |
|||||||
| 17 | ||||||||
| 18 | In both cases, you must define the git remote address at minimum. Note that only SSH remotes are currently supported. |
|||||||
| 19 | ||||||||
| 20 | For authorization, An Otter Wiki supports SSH keys as the most secure and straightforward method. Alternatively, you can configure authorization externally (on your host system if running An Otter Wiki natively, or inside the container), make sure that `ssh` command can authenticate with the remote server. |
|||||||
| 21 | ||||||||
| 22 | When setting up automated pulls, note the generated webhook URL - it's unique to each remote URL. If you change your remote URL, get the new webhook URL as well. |
|||||||
| 23 | ||||||||
| 24 | Both push and pull configurations add buttons at the bottom right of the page, allowing you to test your settings. |
|||||||
| 25 | ||||||||
|
26 | [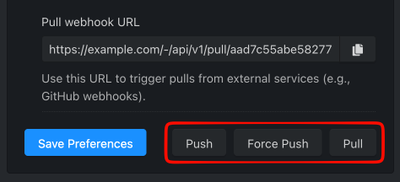](./repository-management-actions.png) |
||||||
| 27 | ||||||||
|
28 | ### Configuration via environment variables |
||||||
| 29 | ||||||||
| 30 | Instead of using the **Repository Management** page, the push and pull settings can be configured via environment variables or the `settings.cfg`, see [[Configuration#repository-management|Configuration]]. For example with docker compose: |
|||||||
| 31 | ||||||||
| 32 | ```yaml |
|||||||
| 33 | services: |
|||||||
| 34 | otterwiki: |
|||||||
| 35 | image: redimp/otterwiki:2 |
|||||||
| 36 | restart: unless-stopped |
|||||||
| 37 | ports: |
|||||||
| 38 | - 8080:80 |
|||||||
| 39 | volumes: |
|||||||
| 40 | - ./app-data:/app-data |
|||||||
| 41 | environment: |
|||||||
| 42 | GIT_REMOTE_PUSH_ENABLED: true |
|||||||
| 43 | GIT_REMOTE_PUSH_URL: git@github.com:user/wiki.git |
|||||||
| 44 | GIT_REMOTE_PUSH_PRIVATE_KEY: | |
|||||||
| 45 | -----BEGIN OPENSSH PRIVATE KEY----- |
|||||||
| 46 | ... |
|||||||
| 47 | -----END OPENSSH PRIVATE KEY----- |
|||||||
| 48 | GIT_REMOTE_PULL_ENABLED: true |
|||||||
| 49 | GIT_REMOTE_PULL_URL: git@github.com:user/wiki.git |
|||||||
| 50 | GIT_REMOTE_PULL_URL_SECURE: true |
|||||||
| 51 | GIT_REMOTE_PULL_PRIVATE_KEY: | |
|||||||
| 52 | -----BEGIN OPENSSH PRIVATE KEY----- |
|||||||
| 53 | ... |
|||||||
| 54 | -----END OPENSSH PRIVATE KEY----- |
|||||||
| 55 | ``` |
|||||||
| 56 | ||||||||
| 57 | *Please note:* Settings saved on the **Repository Management** page are stored in the database and take precedence over environment variables. If you configure the remotes via environment variables, avoid saving the form in the settings interface, otherwise the environment variables will be ignored. |
|||||||
| 58 | ||||||||
| 59 | When pulling is configured via environment variables, the webhook URL can be copied from the **Pull webhook URL** field on the **Repository Management** page. Set `GIT_REMOTE_PULL_URL_SECURE: true` so that the webhook URL is derived from the `SECRET_KEY`, this requires the `SECRET_KEY` to be configured explicitly (with the default docker setup a random `SECRET_KEY` is generated on first start and stored in `/app-data/settings.cfg`, which works fine as long as the volume is persistent). |
|||||||
| 60 | ||||||||
|
61 | ### GitHub Example |
||||||
| 62 | ||||||||
| 63 | This example shows how to set up automatic pushing and pulling between your wiki and a GitHub repository `user/wiki`, including SSH key authorization. |
|||||||
| 64 | ||||||||
| 65 | First, get the remote URL from GitHub, for this example it will be `git@github.com:user/wiki.git`. |
|||||||
| 66 | ||||||||
| 67 | #### Authorization with SSH Key |
|||||||
| 68 | ||||||||
| 69 | 1. Generate a new SSH key using `ssh-keygen -t ed25519 -f mywiki` |
|||||||
| 70 | 2. You'll get two files after that: `mywiki` (private key) and `mywiki.pub` (public key) |
|||||||
| 71 | 3. Go to your GitHub repository > **Settings** > **Deploy keys** > **Add deploy key** |
|||||||
| 72 | 4. Paste your public key (`cat mywiki.pub`) into the **Key** field |
|||||||
| 73 | 5. Check **Allow write access** if you plan to enable automatic pushes |
|||||||
|
74 | 6. Click **Add key** to save |
||||||
|
75 | |||||||
|
76 | [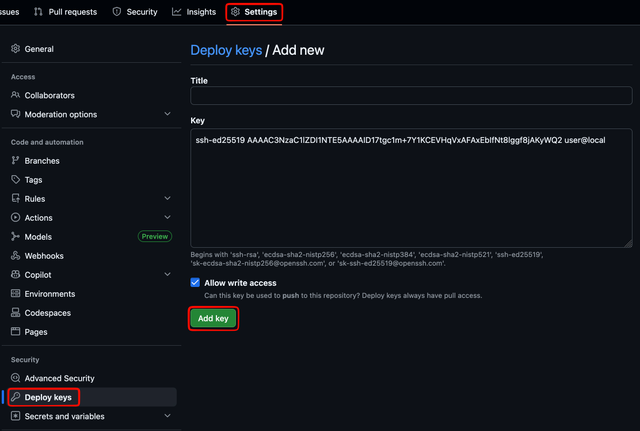](./github-add-deploy-key.png) |
||||||
| 77 | ||||||||
|
78 | > [!TIP] |
||||||
| 79 | > For security reasons, you can safely delete the local key files (`mywiki` and `mywiki.pub`) after completing this setup, since An Otter Wiki stores the private key and GitHub stores the public key. |
|||||||
| 80 | ||||||||
| 81 | #### Automatic Pushing |
|||||||
| 82 | ||||||||
| 83 | 1. Check **Enable pushing to SSH remote** |
|||||||
| 84 | 2. Paste your GitHub remote URL in the **SSH Remote URL** field |
|||||||
| 85 | 3. Paste your private key (`cat mywiki`) in the **SSH Private Key (Optional)** field |
|||||||
| 86 | 4. Click **Save Preferences** |
|||||||
| 87 | 5. Click **Push** in the bottom right to test pushing existing changes to the remote |
|||||||
| 88 | 6. If successful, try editing or creating a page in your wiki - changes should immediately appear on GitHub |
|||||||
| 89 | ||||||||
| 90 | #### Automatic Pulling |
|||||||
| 91 | ||||||||
| 92 | 1. Check **Enable pulling from SSH remote** |
|||||||
| 93 | 2. Paste your GitHub remote URL in the **SSH Remote URL** field |
|||||||
| 94 | 3. Paste your private key (`cat mywiki`) in the **SSH Private Key (Optional)** field |
|||||||
| 95 | 4. Click **Save Preferences** |
|||||||
| 96 | 5. Click **Pull** in the bottom right to test pulling existing changes from the remote |
|||||||
| 97 | 6. If successful, copy the webhook URL from the **Pull webhook URL** field |
|||||||
| 98 | 7. Go to your GitHub repository > **Settings** > **Webhooks** > **Add webhook** |
|||||||
| 99 | 8. Paste the webhook URL into the **Payload URL** field and select `application/json` as the **Content type** |
|||||||
| 100 | 9. Click **Add webhook** to save |
|||||||
| 101 | 10. Test by editing or creating a file on the GitHub side - changes should be immediately pulled into the wiki |
|||||||
|
102 | |||||||
| 103 | [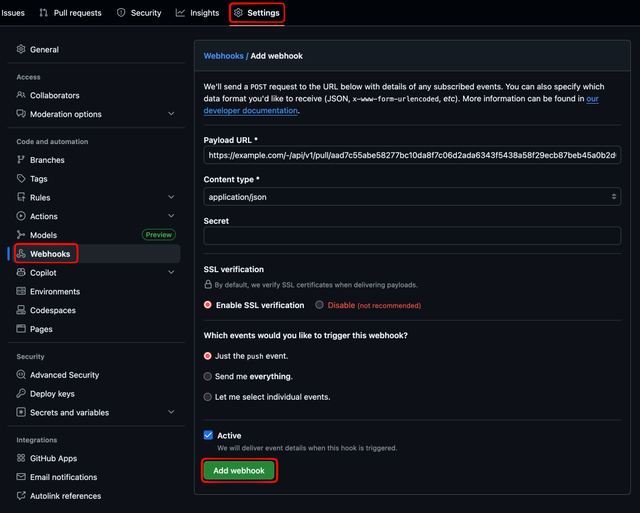](./github-add-webhook.png) |
|||||||